
[ad_1]
Asparagus spears are a delicious early spring vegetable.
Barbara H. Smith, ©2017 HGIC, Clemson Extension
Asparagus (Asparagus officinalis) is a hardy perennial that is native to the Mediterranean. Once the plants are established, they will provide delicious spears every spring. Although asparagus takes two to three years to begin production, it will be highly productive for seven to eight years before gradually declining.
Bed Preparation
Choose a site for a permanent asparagus bed that has good drainage and full sun. Plan accordingly as the tall ferns of asparagus may shade other plants. Bed preparation is best done in the fall. Enrich the soil with additions of compost or leaf mold at the rate of 20% by volume.
Follow the results of a soil test to maintain a soil pH between 6.0 and 6.5 and optimal fertility levels. If lime is recommended from soil test results, it should be applied during bed preparation at least three months before planting. For more information, see HGIC 1652, Soil Testing.
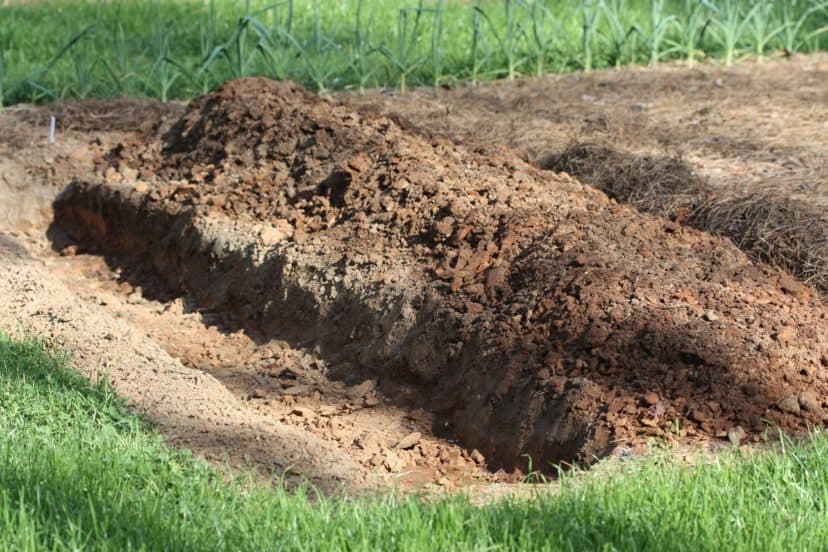
In heavy soils, double-digging is recommended. To double-dig, remove the top foot of soil from the planting area. With a spading fork or spade, break up the subsoil by pushing the tool into the next 10 to 12 inches of soil and rocking it back and forth. Do this every 6 inches. Double-digging is ideal for preparing a 6 to 8 inch deep trench required for planting asparagus. The extra work of breaking up the subsoil will greatly improve root growth. The trench is dug 12 to 18 inches wide, with 4 to 5 feet between trenches. Mix the topsoil that has been removed with organic matter and spread about 2 inches of the mixture in the bottom of the trench or bed at the rate of 20% by volume.

The asparagus is a perennial crop, so place the row(s) along a side of the garden space. Dig the trench 12 to 18 inches wide for the asparagus planting.
Joey Williamson, ©2016 HGIC, Clemson Extension.

Purchase 2 year-old crowns, which are larger and will produce more harvestable spears in the next 2 years.
Joey Williamson, ©2016 HGIC, Clemson Extension
Planting Dates for Crowns
| Area | Dates |
| Piedmont | Mar 1 – April 15 |
| Coastal | Feb 1 – March 15 |
Planting
Start asparagus from 1 to 2-year-old disease-free crowns. Refer to the table below for the correct planting date for the different gardening regions within South Carolina. If the crowns are planted too late in the spring, they may begin sprouting before planting, which can injure the developing buds.

South Carolina Gardening Regions
Piedmont: Abbeville, Anderson, Cherokee, Chester, Chesterfield, Edgefield, Fairfield, Greenville, Greenwood, Kershaw, Lancaster, Laurens, Marlboro, McCormick, Newberry, Oconee, Pickens, Saluda, Spartanburg, Union, and York Counties.
Coastal Plain: Aiken, Allendale, Bamberg, Barnwell, Beaufort, Berkeley, Calhoun, Charleston, Clarendon, Colleton, Darlington, Dillon, Dorchester, Florence, Georgetown, Hampton, Horry, Jasper, Lee, Lexington, Marion, Orangeburg, Richland, Sumter, and Williamsburg Counties.
Set the crowns 15 to 18 inches apart and 6 to 8 inches deep. Mound the soil slightly under each, so that the crown is slightly above the roots. Crowns should be dirty wheat-brown in color, plump, healthy-looking, and have 15 to 20 storage roots. Remove any rotted or damaged roots before planting. Spread the roots out over the mound of soil and cover the crown with 2 inches of soil. As the plants grow, continue to pull soil over the crowns (about 2 inches every two to three weeks) until the trench is filled, and the crowns are 6 to 8 inches deep. Water if rainfall is inadequate.

After the trench is dug and the soil is piled beside the trench down the row, amend the soil with compost and the recommended nutrients. Mix in the amendments well and pull some of this soil into the trench. Mound the soil within the trench to form a ridge down the row (as in the photo above). Place the asparagus crowns over this ridge, spread out their roots, and covered them with 2 inches of soil.
Joey Williamson, © 2016 HGIC, Clemson Extension

The bed above has been planted with asparagus crowns, covered with 2 inches of soil, and the cultivars labeled. Additional soil is still available beside the row to add more around the emerging spears.
Joey Williamson, ©2016 HGIC, Clemson Extension
Recommended Cultivars
Asparagus is dioecious which means that the male and female flowers form on separate plants. The female plants expend more energy to produce seeds; therefore, the female plants will have a much lower yield than the males. Old standard cultivars, such as Martha Washington, Mary Washington, and Waltham Washington have a higher percentage of female plants that in turn will reduce yield. All-male hybrid cultivars are now available that will outperform the old cultivars 3 to 1 in production. Typically, the all-male cultivars have around 93% male plants with 7% female plants. After the female plants produce seed, they can be eliminated from the asparagus planting.
Some of the better producing male cultivars are:
- Jersey King—This is vigorous and disease-resistant cultivar with a lower yield than other Jersey cultivars, but will have larger spears. It performs well in warm, southern climates.
- Jersey Knight—A later maturing variety, but this cultivar has the highest quality of spears in the Jersey series. It has a higher yield and performs well in clay soils.
- Jersey Gem—It is an early producing cultivar with medium to larger diameter spears and grows best in cooler climates.
- Jersey Giant—An asparagus cultivar that has a moderate yield with extra large spears, but adapts well to the south.
- Jersey Supreme—This early season cultivar produces high yields. It adapts well to both warm and cold climates.
- Purple Passion—This cultivar has purple spears, but the spears turn green with cooking. Crowns may be 50/50 male and female plants.
Fertilizing
Nitrogen, phosphorus, and potassium are all important at planting and throughout the entire life-span of asparagus.
Pre-plant applications of phosphorus and potassium depend on soil test results. It is best to get the phosphorus down into the planting furrow at transplanting because the crowns will ultimately be 6 to 8 inches deep and phosphorus moves very slowly down through the soil. In the absence of a soil test, apply 5 lbs 5-10-10 per 100 feet of row in the trench and cover with at least 2 inches. Then set the crowns over the ridge in the trench.
A complete fertilizer is required in the years following transplanting. A soil test is always the best method of determining the fertilization needs of the crop. In the absence of a soil test, apply 5 lbs of 5-10-10 per 100 feet of row in the very early spring before spears emerge. Then sidedress with 1½ lbs calcium nitrate (15.5-0-0) per 100 feet of row after harvest. For this and most other fertilizers, a pint is equal to a pound. Asparagus also benefits from yearly top-dressing of compost, again at the rate of 20% by volume.
Watering
Adequate soil moisture is important to keep young plants growing rapidly. Good growth in the first year is important for large crowns. During the period of stand establishment, they should not be water-stressed or over-watered. Water sufficiently to moisten the soil to a depth of at least 6 inches. Light watering will lead to shallow rooted plants.
Cultural Practices
To avoid accidentally breaking off spears, weed the bed each spring before the first shoots come up. During the production period, it is best to pull rather than hoe weeds. Maintain a 2- to 3-inch layer of mulch throughout the year.
Harvest & Storage
Depending on the variety, asparagus crowns may need two to three full growing seasons before limited harvesting can be done in the third or fourth year. Less vigorous varieties, such as Purple Passion, may need an additional year to mature. The fleshy root system needs to develop and store food reserves to produce growth during subsequent seasons. In all asparagus planting, cut the foliage down to 2-inch stubs in late winter after they turn brown, but before the spears emerge in spring. Letting the ferns turn brown allows nutrients to be exported from the foliage into the crowns for next year’s growth. A light mulch will help keep the soil surface from becoming too hard for the shoots to break through easily.
Harvest lightly in the third or fourth year for three to four weeks as long as the ferns the year before were very vigorous, bushy, and shoulder-high. Harvest spears daily during the harvest period. Spears that are 6- to 8-inches are the best size for harvest and should be cut or snapped off at the soil surface before the tips begin to separate. Cutting too deeply can injure the crown buds that produce the next spears. If the asparagus is allowed to get much taller, the base of the spear may be tough and will have to be cut.
Stop harvesting when the diameter of the spears has been reduced to pencil-size and allow the spear to grow to full height. After harvest, process or refrigerate immediately. Asparagus can be frozen or canned. Asparagus has an attractive, fern-like foliage that makes a nice garden border.

Asparagus has an attractive fern-like foliage.
Barbara H. Smith, ©2017 HGIC, Clemson Extension
Some gardeners prefer to support the growing foliage with stakes and strings to keep them tidy. In high-wind areas, plant the rows parallel to the prevailing winds so that the plants support each other to some extent.
Problems
Plants harvested too heavily too soon often become weak and spindly, and the crowns may never recover. Crown rot or poor production may occur in heavy soil that is inadequately prepared. Water stress during the first two months (while establishing a root system) can reduce yields during the life of the bed.
The primary insect pest is the asparagus beetle. Adults and larvae feed on spears and ferns. Asparagus beetles can be controlled by sprays with carbaryl every 10 to 14 days or with spinosad every 7 to 10 days. These two insecticides have pre-harvest intervals, that is, the time between spraying and harvesting, of 1 and 60 days, respectively. Please see Table 1 for products containing these insecticides.
Diseases that may occur in the home garden include rust, Fusarium crown rot, Fusarium stem canker, stem anthracnose, soft rot, and root rot. To prevent Fusarium crown rot, choose a spot that has never been planted to asparagus. Make sure the soil pH is 6.5 to 7.5. Plant a Fusarium-resistant hybrid, such as Jersey Gem, Jersey Giant, or Jersey Knight. Rust can be controlled with sprays of myclobutanil or sulfur. The preharvest intervals for these two fungicides are 180 and 0 days, respectively. So, the myclobutanil cannot be sprayed until after harvest is complete that year. Anthracnose also can be controlled by myclobutanil, but again, the pre-harvest interval is 180 days. For stem disease control, such as anthracnose or Fusarium stem canker, the affected canes can be cut and removed instead of spraying. Use drip irrigation rather than over-head irrigation to lessen the chance and spread of disease. Please see Table 1 for products containing these fungicides.
Table 1. Insecticides and Fungicides for Asparagus Insect Pest and Disease Control.
| Active Ingredient | Brand Names and Products |
| Carbaryl | Garden Tech Sevin Concentrate (also in RTS1) Ferti-lome Liquid Carbaryl Garden Spray |
| Myclobutanil | Spectracide Immunox Multi-Purpose Fungicide Concentrate (also in RTS1) Monterey Fungi-Max Multi-Purpose Fungicide |
| Spinosad | Southern Ag Conserve Naturalyte Insect Control Concentrate Bonide Colorado Potato Beetle Beater Concentrate Bonide Captain Jack’s Dead Bug Brew Concentrate; & RTS1 Ferti-lome Borer, Bagworm & Leafminer Spray Concentrate Monterey Garden Insect Spray Concentrate Natural Guard Landscape & Garden Insecticide RTS1 |
| Sulfur | Hi-Yield Wettable Dusting Sulfur Safer Brand Garden fungicide Concentrate Southern Ag Wettable or Dusting Sulfur Bonide Sulfur Plant FungicideFert-lome Dusting Sulfur |
| 1RTS = Ready to Spray (hose-end applicator) Note: As with all pesticides, read and follow all label instructions and precautions. |
|
Last updates were done on 1/23 by Millie Davenport.
Originally published 12/99
If this document didn’t answer your questions, please contact HGIC at [email protected] or 1-888-656-9988.
[ad_2]