
[ad_1]
Onions and the related shallots, leeks and garlic all grow best during cool weather and are usually planted in the fall in South Carolina for late spring harvest. Onion plants can also be planted in early spring for summer harvest. Leeks are planted in late summer or early fall for winter harvest. Shallots and garlic both grow best from a fall planting. All onion relatives should be grown in full sun for best results.
For green or bunching onions, plant sets or transplants in the spring.
Barbara H. Smith, ©2016, HGIC, Clemson Extension
Onions
Planting: Onions (Allium cepa) are grown either from seed, sets (tiny immature bulbs), or transplants. The different methods vary in the season and area that they are best suited for. Plant seed for bulb onions in the early fall. Onion sets can be planted in fall or early spring. Onions grown from transplants should be planted in the early spring for best results.
Plant onions in rows 1 to 2 feet apart in a moist seedbed. Sets should be planted 1½ inches deep and seeds ½ inch deep. Place seeds or sets 1 to 2 inches apart in the row for green onions and 3 inches for bulb onions.
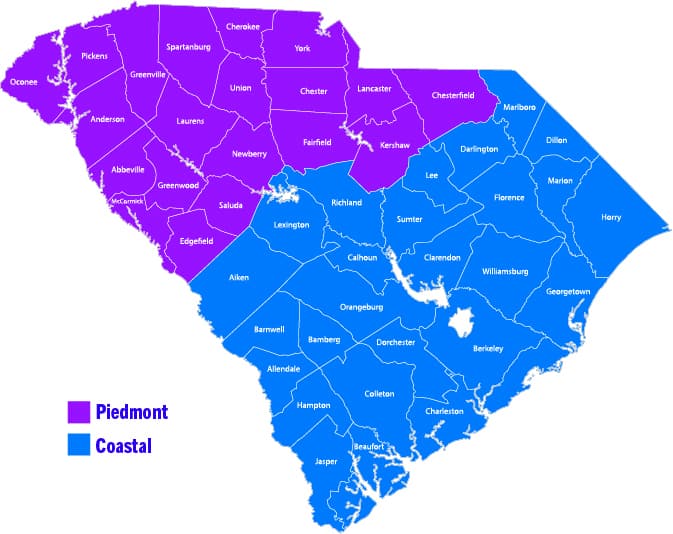
| Area | Spring | Fall |
| Onion Sets | ||
| Piedmont | Feb 15 to Mar 30 | Sept 15 to Oct 15 |
| Coastal | Feb 1 to Mar 15 | Sept 15 to Nov 15 |
| Onion Plants | ||
| Piedmont | —- | Sept 15 to Oct 15 |
| Coastal | —- | Oct 1 to Nov 15 |
| Onion Seed | ||
| Piedmont | — | — |
| Coastal | — | Sept 15 to Oct 30 |

South Carolina Gardening Regions
Piedmont: Abbeville, Anderson, Cherokee, Chester, Edgefield, Fairfield, Greenville, Greenwood, Lancaster, Laurens, McCormick, Newberry, Oconee, Pickens, Saluda, Spartanburg, Union, and York counties.
Central: Aiken, Allendale, Bamberg, Barnwell, Calhoun, Chesterfield, Clarendon, Darlington, Dillon, Florence, Kershaw, Lee, Lexington, Marion, Marlboro, Orangeburg, Richland, and Sumter counties.
Coastal: Beaufort, Berkeley, Charleston, Colleton, Dorchester, Georgetown, Hampton, Horry, Jasper, and Williamsburg counties.
Planting in raised garden rows will ensure better drainage and make pulling the soil away from the bulbs easier at maturity. Add organic matter to the garden soil to prevent compaction.
Irrigate immediately after setting to firm the soil around roots, reduce air pockets that dry out young roots, and ensure good soil moisture for new root growth. Keep the beds moist until plants are established.
For green or bunching onions, use sets or transplants in the spring. Sets and plants will be ready to eat in six to eight weeks. Thinnings of seed-grown bulb onions can also be eaten as green onions.
Planting Onions from Sets: Onions grown from sets do not make the best bulbs, and are rather costly. Avoid sets more than an inch in diameter, as they are likely to bolt. Late plantings are more susceptible to cold or freeze injury. Planting too early can result in increased seed stem production.
Planting Onions from Seed: Plant onion seed directly in the garden in fall in Coastal and Central areas of the state. Seed is not a recommended method for growing onions in the Piedmont area of South Carolina. Sow eight to 12 seeds per foot of row ½ to ¾ inches deep. If larger bulbs are desired, thin in spring to 4 inches apart and eat the thinned plants as green onions.
Planting Onions from Transplants: Set out transplants from late December through February. Plants should be about 6 inches high and about half the thickness of a lead pencil at the time of transplanting. Set plants with the bottom of the plant about 1 to 1½ inches below the surface of the soil. Transplants should be spaced 3 to 4 inches apart in the row.
When you obtain onion plants, they should be dry. Do not wet them or stick their roots in soil or water. Unpack and store plants in a cool, dry place until ready to plant. Properly stored onion plants will last up to three weeks.
Recommended Cultivars: Onions are classed as long or short day varieties based on the number of hours of daylight required to make a bulb. Short day varieties set bulbs with about 12 hours of daylight and are suitable for growing throughout South Carolina. They generally have a mild, sweet flavor, and are best eaten fresh. They do not store especially well, but are very sweet. Intermediate day onions may be grown in the Upstate. Long day onions cannot be successfully grown in the South.
Varieties for home gardeners include the following.
Bulbing Onions:
- Candy
- Granex (white)
- Stockton Sweet Red
- Texas Early Grano
- Yellow Granex.
Green Bunching Onions: Green onions may be onions of any variety that are harvested before they bulb. The following onion varieties are especially bred for bunching.
- Beltsville Bunching
- Evergreen Bunching
Soil: A fertile, well-drained, loamy soil with plenty of organic matter is best for growing quality onions. Clay soils often produce a hotter onion, while sandy soils require more fertilizer and water than loamy soils. The ideal pH is between 6.2 and 6.5.
Fertilization: It is best to base fertilizer application on the results of a soil test. For more information, see HGIC 1652, Soil Testing
In the absence of a soil test, apply 9 pounds of 10-10-10 per 1,000 square feet before planting. Then, 1-2 weeks after bulb enlargement begins, sidedress with 12 pounds of 5-10-10 per 1,000 square feet and 0.50 pounds of sulfur per 1,000 square feet. About 30 days later, sidedress with 12 pounds of calcium nitrate (15.5-0-0) per 1,000 square feet.
Avoid excessive application of fertilizer. High rates of nitrogen late in the fall may result in the plants being more susceptible to winter kill. Onions excessively fertilized with nitrogen do not store well. Excess nitrogen late in the growing season delays maturity and causes doubling.
Watering: Proper soil moisture is critical for continuous root growth and for supplying the needs of the foliage and bulb. During the growing season make sure onions have plenty of moisture, especially after bulbs begin enlarging to assure large bulbs and better yields. A week before harvest, discontinue watering to encourage the onion to form protective scales.
Cultural Practices: Good weed control in onions is essential. Cultivate shallowly as often as needed to control weeds, but do not hill up soil around the plants as this can encourage stem rot. Once onion roots have begun to extend into the row middles, discontinue cultivation. Late cultivation can cause root pruning, leading to water stress and invasion by diseases.
About a month before harvest, start working the soil gradually away from the bulbs. By about 7 to 10 days before harvest time, the bulb should be one-third above ground to hasten bulb and neck drying.
Harvesting & Storage: Harvest bulb onions when about three‑fourths of the tops have fallen over. Remove tops by cutting 1 to 1½ inches above the top of the bulb. Thoroughly air-dry bulbs in a shaded area before storage.

After harvesting, thoroughly air-dry bulbs in a shaded area before storage.
Barbara H. Smith, ©2016 HGIC, Clemson Extension
Although most short day onions do not store well, for best results, keep the dry bulbs in shallow boxes or mesh bags in a cool, well-ventilated place. Ideal conditions are between 45 °F and 55 °F, and 50 to 60 percent humidity.
Harvest green onions when tops are 6 to 8 inches tall. Store them in a plastic bag in the refrigerator for up to two weeks.
Problems: Diseases are seldom a problem of onions in the home garden. Good cultural practices will help prevent disease. Never plant onions in the same area more often than once every four years. Plant in well-drained soil or raised beds. To avoid storage diseases, be sure onions are well-cured before storing. Avoid planting in soil known to be infested with nematodes.
The most damaging insect pests of onions are the onion maggot, which feeds on the bulbs, and onion thrips, which suck sap from the leaves. Onion maggots are attracted to decomposing organic matter. Good sanitation is necessary to avoid maggots.
Onions will bolt (produce a flower stalk) if exposed to a prolonged cold period following a favorable growing period. This results in small bulbs with large necks which are hard to cure and generally unusable. The larger the plants are at the time of exposure to the cold period the higher the rate of bolting.
To help prevent bolting:
- Select onion sets of an inch or less and transplants about 6 inches high and about half the thickness of a lead pencil.
- Plant at the correct time for your area.
- Avoid high fertilizer rates applied in the fall.
Other Cultural Problems: Common problems of onions include bulb rot, split, or double bulbs from dry soil, and small bulbs from late planting or dry soil. Heavy nitrogen application later in the season may result in large necks.
Leeks
Leeks (Allium cepa var. porrum) look much like a very large, thick green onion. They develop edible 6- to 10-inch long, white stems as much as 2 inches in diameter. The leaves are thick, flat, and blue green. Their flavor is milder than either onions or garlic.

Leeks look much like a very large, thick green onion.
Barbara H. Smith, ©2016 HGIC, Clemson Extension
Planting: Leeks may be grown from seeds or transplants planted in late summer or early fall for harvesting during early winter. Plant 10 to 15 seeds per foot of row, and thin to 4 inches apart, or set transplants 4 inches apart. They require about 120 days from seed to maturity. Leeks mature best during temperatures averaging below 75 °F.
Recommended Cultivars: The variety ‘Arkansas’ is recommended for growing in South Carolina.
Fertilization: It is best to base fertilizer application on the results of a soil test.
In the absence of a soil test, apply 25 pounds of 5-10-10 per 1,000 square feet before planting. Leeks should be sidedressed four times throughout the growing season with 3 pounds of calcium nitrate (15.5-0-0) per 1,000 square feet. This should be done mid-November, early January, mid-February, and early March.
Culture: Leeks will grow in any garden that will produce good onions. The edible portion of the leek stem should be blanched for best flavor and tenderness. When the plants are at least the width of a pencil, begin to gradually draw soil up around the base of the plant to blanch the lower stem. Avoid starting to blanch the stems too early. Otherwise, grow as you would onions.
Harvesting & Storage: Leeks are ready for harvest when they are an inch or more in diameter. Leeks will keep for several weeks in a refrigerator.
Problems: Leeks are subject to the same problems as are onions.
Shallots
Shallots (Allium cepa var. aggregatum) are often considered the gourmet member of the onion family. They have a mild, delicate but distinctive flavor and can either be grown for use as green onions or for the clusters of small bulbs that are used like garlic or onions.

Shallots have a mild, delicate but distinctive flavor.
Barbara H. Smith, ©2016 HGIC, Clemson Extension
Planting: Bulbs are planted in fall for winter and spring harvest. Space shallots about 6 to 8 inches apart within the row, and plant the individual sets 1 to 2 inches deep. Keep the soil moist to encourage sprouting.
Culture: Grow shallots as you would onions. During the growing season, some of the leaves may be cut at the ground level and used as green onions. Plants that are not heavily cut will proceed to form many bulbs attached together forming a clump. Shallot bulbs often develop on top of the ground. Do not cover them with soil.
Harvesting & Storage: Shallots can be harvested for use as green onions 60 days after planting, or in the late spring after the tops have died down completely for dry bulbs. Cure bulbs in a warm, dry place for about a week.
Store in mesh bags in cool, dry conditions. Replant the smaller bulbs or use them first since they do not keep well. Green shallots can be stored in the refrigerator for up to two weeks.
Problems: Shallots are subject to the same problems as are onions.
Garlic
Garlic (Allium sativum) differs from onion in that its bulb is composed of about 10 cloves arranged inside a papery bulb cover.

Garlic (Allium sativum) differs from onion in that its bulb is composed of about 10 cloves arranged inside a papery bulb cover.
Barbara H. Smith, ©2016 HGIC, Clemson Extension
Planting: Garlic grows best in full sun in well-drained, fertile, loamy soils with a soil pH between 6.2 and 6.5. Bulbs will be small if the soil is excessively dry, and irregular in shape if the soil becomes compacted.
Garlic must be planted in the fall to permit full development. Plant early enough in the season because vegetative growth ceases when the bulb develops in response to longer days and warmer temperatures in the spring.
Garlic is started by planting cloves that are divisions of the large bulb. Larger cloves yield larger size mature bulbs at harvest. Also, the size of the harvested cluster is directly related to the amount of leafy growth produced prior to bulbing. Plant the larger outer cloves 3 to 5 inches apart in an upright position to ensure a straight neck, and cover them to a depth of about 1 inch. Allow 12 to 24 inches between rows. Garlic grows well in a wide row system of planting, spacing cloves 3 to 4 inches apart in rows a foot wide.
Fertilizing: A soil test is always the best method for determining the fertilization needs of the crop. In the absence of a soil test, apply 25 pounds of 5-10-10 and 0.50 pounds of sulfur per 1,000 square feet before planting. Garlic needs to be sidedressed throughout the growing season as recommended in the following table:
Fertilizing Garlic
| Date | Fertilizer |
| Mid-November | 4 lbs. calcium nitrate (15.5-0-0) per 1,000 sq. ft. |
| Early January | 10 lbs. 5-10-10 per 1,000 sq. ft. 0.50 lb. sulfur per 1,000 sq. ft. |
| Mid-February | 4 lbs. calcium nitrate per 1,000 sq. feet |
| Early March | 4 lbs. calcium nitrate per 1,000 sq. ft. |

Plant garlic cloves 3 to 5 inches apart with the pointed side up.
Joey Williamson, ©2015 HGIC, Clemson Extension
Watering: Consistent soil moisture is important and is especially critical during the bulbing period. Monitor moisture, and water the plot as necessary. However, when the crop is nearing maturity, somewhat dry soil is best.
Cultural Practices: Stiffneck garlic varieties should be topped in early summer. A hard, round stem called a scape will grow upward. A topset will begin to form. Cut or clip off the topsets with a few inches of the scape. If you do not top your stiff-neck type garlic, the bulb size will be reduced by an average of 30 percent. Mulch with weed-free straw to a depth of about 4 to 6 inches in late fall. Garlic does not do well with competition from weeds.
Cultivars: There are many kinds of garlic and they differ in size, color, shape, taste, number of cloves per bulb, pungency, and storability. The two basic types of garlic are called soft-necks and hard-necks. Soft-neck garlic varieties (subspecies sativum) do not make a seed stalk. They are good for braiding and tend to keep longer than hard-neck types. Hard-neck types (subspecies ophioscorodon) produce a seed stalk and peel easier than soft-neck garlic.

Soft neck garlic (Allium sativum) bulb and cloves. Plant the larger, outer cloves.
Joey Williamson, ©2015 HGIC, Clemson Extension
Soft-neck Types: Artichoke garlics are the kind most commonly seen in supermarkets, with between 12 and 20 small cloves per bulb. The bulbs are generally very large and mild. They are easy to grow and store well.
Silverskin garlics are generally the longest storing of all garlics and have soft, pliable necks that braid well. They are usually strongly flavored. Silverskins have many cloves per bulb but are not as large as artichoke varieties.
Creole garlics are mild but full-flavored. They are good for eating raw and retain their flavor well when cooked. They have 8 to 12 cloves per bulb. They are easily grown in southern climates and are much more tolerant of adverse weather conditions than most garlic. Creole garlic varieties include ‘Burgundy’ and ‘Ajo Rojo.’ They are harvested mid- to late season and can be stored up to seven or eight months.
Hard-neck Types: Purple stripe garlics usually have very thick purple and white striped bulb wrappers. They tend to be strong in flavor and store fairly well. Most mature mid- to late season.
Porcelain garlics have very thick, parchment-like bulb wrappers and four to eight large, fat cloves per bulb. They are generally strong-tasting garlics and store well, if grown well. Storability may be severely shortened by drought following an early, hot spring.
Rocambole garlics do not grow well in warm climates and should not be grown in South Carolina.
Elephant garlic (A. ampeloprasum) is not a true garlic although it should be treated the same as regular garlic. The bulbs are often more than twice the size of the largest real garlic. It has a very mild flavor with an onion-like aftertaste. The bulbs average five very large yellowish cloves. It is usually disease-free and does not seem to be bothered by insects.

Cure garlic for two to three weeks in a warm, shady place with good air movement.
Barbara H. Smith, ©2016 HGIC, Clemson Extension
Harvesting & Storage: Garlic will be ready to harvest when the leaves begin to yellow in early summer. Lift up the entire plant by hand or with a spading fork, being careful not to bruise the bulbs. Brush off the soil but do not wash the bulbs. Cure in a warm, shady place with good air movement. Hang in bundles or spread as a single layer on screens or drying racks. Allow bulbs to dry until the neck is dry and the outer skin is papery, approximately two to three weeks.
Remove tops when dry. Store by braiding or tying several heads together and hanging up, or by cutting tops off and placing bulbs in a mesh bag. Most varieties will keep for six to eight months in a well-ventilated, cool, dry area.
Problems: Garlic is prone to bulb rot in poorly drained soils. Bulb rot can also occur in storage from bruising and insufficient drying. Thrips and root maggots are the main insect pests, as they are with onions.
Document last updated on 01/23 by Millie Davenport.
Originally published 11/99
If this document didn’t answer your questions, please contact HGIC at [email protected] or 1-888-656-9988.
[ad_2]